

Phantom Blade Zero is fast, stylish and absolutely willing to flatten you if you bring the wrong habits into a fight. Standard Soulslike muscle memory will only get you so far. Some of its most useful tricks involve doing things other action games have trained you not to do, like attacking while blocking or pressing dodge and parry together.
Then there are the less obvious problems: an excellent accessory buried behind a reusable crank, side quests that disappear as the world changes, and valuable skill materials hidden in places that look like scenery.
These are the ten things I’d want to know early, from equipment worth tracking down to the combat mechanics that make the nastiest bosses more manageable. There are location and side-quest spoilers ahead, but I’m keeping the focus on useful discoveries rather than story revelations.
Key Takeaways
- The Reflex Device widens parry and perfect dodge windows by 15%, rising to 25% when fully upgraded.
- Guarding while attacking, weapon swapping and simultaneous dodge-parry inputs provide valuable combat options.
- Complete side quests promptly because world changes can remove NPCs and rewards, while Remnant Dust is limited.
- Revisit changed areas and investigate face-bearing banyan trees for optional routes and valuable skill materials.
Table of Contents
- 10. Get the Reflex Device as Early as Possible
- 9. Some Early Weapons Are Much Better Than They First Appear
- 8. You Can Block and Attack at the Same Time
- 7. Bosses Require a Different Rhythm from Ordinary Fights
- 6. Complete Side Quests When You Get Them
- 5. The Blocked Outpost Route Opens After the World Changes
- 4. The First Banyan’s Heart Is Hidden Beyond an Apparent Dead End
- 3. Standard Attacks Can Automatically Hit Multiple Enemies
- 2. You Can Take an Enemy’s Horse and Ride It
- 1. You Can Dodge and Parry at the Same Time
- Break the Habits That Are Holding You Back
10. Get the Reflex Device as Early as Possible
If I had to recommend one accessory to make a priority, it would be the Reflex Device. Its basic effect increases the timing windows for parries and perfect dodges by 15%. That’s useful immediately, but the upgraded version is where it really earns its equipment slot.
Once you reach the Village of Lu, the third major area, Jewel unlocks accessory refinement. Fully upgrading the Reflex Device increases those timing windows by 25%.
Ordinary enemies give you a reasonably generous margin for defensive timing. Bosses are a different story. When success depends on responding correctly to red and blue aura attacks, a little extra room can make a huge difference. Unless you’re already a parrying god, I’d get this thing and keep it equipped.
How to Find the Reflex Device
The accessory is in the destroyed lower factory area of Weeping Creek Valley. Getting there involves a little backtracking:
- Defeat the Hunt. You need the Phantom Edge obtained from this area’s boss to reach the relevant grapple point.
- Climb to the smokestack and collect the key. The grapple point should be marked on your map.
- Return to the locked door near the path leading towards the factory. The key opens access to its ruined lower section.
- Work your way into the main structure. The route passes endlessly respawning explosive enemies. Bronze monk enemies are another sign that you’re heading the right way.
- Find the save point and nearby furnace mechanism. A suspicious slot takes the Furnace Inspection Crank, normally found in the factory’s upper levels.
- Open the furnace and collect the accessory.
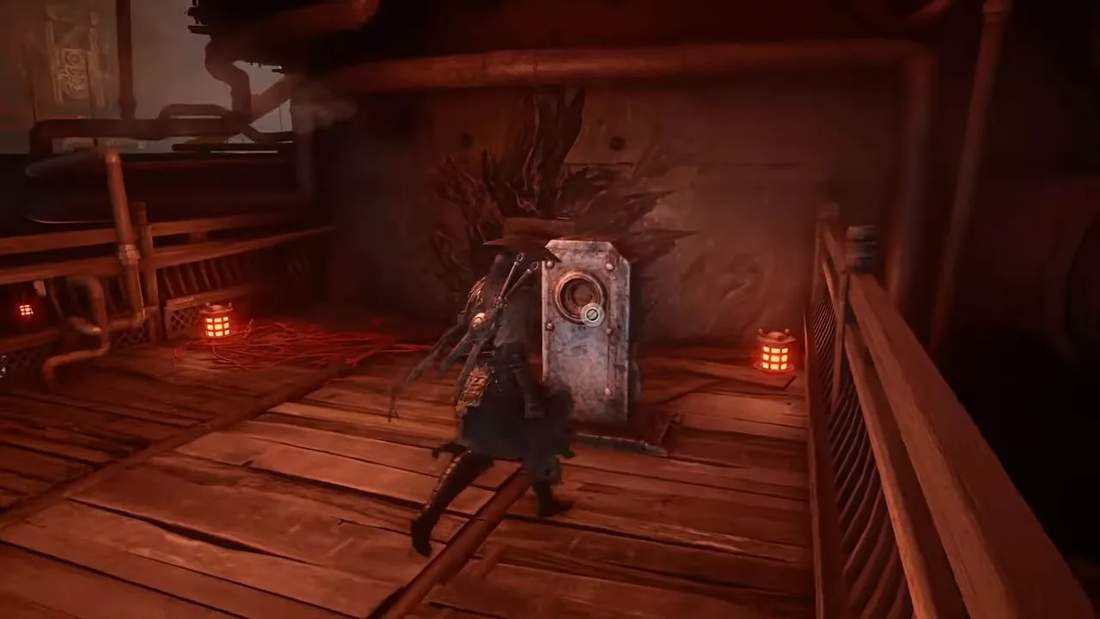
The crank is the part that’s easy to misunderstand. You need to use it in more than one place. If you already inserted it into another furnace access hatch and no longer have it, go back and retrieve it. Using it once doesn’t mean you’re finished with it.
It’s a fairly involved detour for one accessory. In this case, I think the payoff more than justifies the trip.
9. Some Early Weapons Are Much Better Than They First Appear
The familiar weapon-upgrade system makes it tempting to invest in your starting equipment and stop experimenting. I wouldn’t. Several boss weapons introduce genuinely useful mechanics, not just different attack animations.
Not every new weapon is a winner, but these three deserve attention.
The Fanatic’s Broken Blade: A Sword That Does the Chasing for You
The Fanatic’s Broken Blade comes from the Sword Fanatic on the critical path through the Crimson Forest, the second major area. Its big trick is that the sword can leave your hands and attack at range.
To take advantage of that, you need to use its inebriated and drunken states. Executing enemies can trigger these states, or you can activate the drinking action manually by holding block and pressing Triangle.
While drunk, the blade flies out to attack distant targets and can also strike enemies nearby. That makes it excellent for:
- Flying enemies that are otherwise annoying to reach.
- Groups where extra hits help keep things under control.
- Bosses that constantly retreat or refuse to stay within melee range.
Essentially, it gives you a ranged option without a resource cost to fire it. There is a drawback: leaving the drunken state briefly stuns your character. It’s worth remembering, even if it rarely becomes a major problem.
One useful shortcut is that you don’t have to sit through the full drinking animation. Start the action with block and Triangle, then cancel out quickly. The effect still activates.
White Serpent and Crimson Viper: A Strong Dual-Blade Upgrade
If you like the starting Sanguine Twin dual blades, I’d move on to White Serpent and Crimson Viper. They’re fast, hit hard by this game’s standards and offer extended combos that can tear into a boss once its guard breaks.
I consider them a straightforward improvement over the Sanguine Twin. If you’ve already invested resources into that starting weapon, transfer that investment across rather than sticking with it purely because you’ve upgraded it.
The Bronze Sword: Huge Utility, One Serious Catch
The bronze sword earned by defeating the first master in the Village of Lu is more situational. It deals substantial damage, breaks guard effectively and can destroy shields quickly without spending Phantom Charge.
The catch? It cannot parry. That’s a pretty serious limitation in a game where parrying matters this much.
I treat it as a specialist tool rather than an everyday weapon. It’s useful for shield-heavy encounters, bosses that restore their shields and damage opportunities after a guard break. Bring it out when its strengths matter, rather than trying to force every encounter around it.
8. You Can Block and Attack at the Same Time
Holding L1 doesn’t simply put you into a conventional block. It puts you into a guard stance, and that distinction matters because you can keep attacking while the button is held.
Yes, really. You can defend and attack at the same time.
It feels wrong at first because so many action games make you choose between the two. Here, maintaining guard while swinging can help protect you during chaotic fights, particularly when enemies crowd around or attack from behind.
There are limits:
- Holding guard drains your meter. You can’t leave it active indefinitely without consequences.
- Blocking isn’t a substitute for perfect parries. Bosses still demand properly timed counters.
- It’s a situational safety net. Its biggest value is often in messy group encounters, not every single exchange.
I find this especially useful against bosses that summon help. Having a defensive layer while clearing their extra enemies can make a chaotic situation considerably less miserable.
7. Bosses Require a Different Rhythm from Ordinary Fights
Bosses being difficult doesn’t sound like a secret. The important part is how much harder they are than everything around them.
These aren’t just flashy set pieces. They have enormous health pools, aggressive attack strings and a habit of producing another form just when you think you’ve made progress. Getting through a level comfortably doesn’t necessarily mean you’re ready to steamroll its boss.
Before changing settings out of frustration, remember this warning: lowering the difficulty is permanent. You can’t simply turn it back up to your previous setting afterwards. If preserving that difficulty matters to you, take a break and rethink the fight first.
Learn the Aura Attacks Before Chasing Damage
My first priority in a new boss fight is figuring out the counter timings. Correctly answering red and blue attacks creates some of your best damage opportunities.
- Red aura attacks: Practise the dodge response early. Many arrive extremely quickly, so building that recognition into muscle memory matters. Once the timing clicks, these attacks start to feel like opportunities rather than disasters.
- Blue aura attacks: Learn the parry timing instead of assuming every wind-up behaves the same way. These can be less predictable and harder to react to.
- Black aura attacks: I generally recommend dodging. They can be deflected, but taking a hit empties your stamina, and some bosses follow them with a blue attack.
That black-into-blue sequence is particularly nasty. Dodging the first attack preserves your resources and leaves you better placed to parry the follow-up. The Reflex Device helps with the defensive timing, but it doesn’t remove the need to learn the pattern.
Keep Pressure Up Without Mashing
Playing cautiously doesn’t mean spending the whole fight running away. With health bars this large, bosses take forever if you never get your own attacks in.
I generally stick to basic attacks while the boss still has guard, then move into Triangle attacks once that guard breaks. The goal is controlled pressure, not frantic button-mashing.
Even attacks that appear to be deflected still serve a purpose. You may not be taking health away, but you’re draining the boss’s stamina, which creates the opening you actually want.
Weapon Swapping Is Part of Your Defence
Switching weapons instantly refills your meter. That’s not a minor convenience. It’s something you need to build into your combat habits.
If you’ve missed several perfect parries and ended up blocking instead, your stamina can disappear quickly. Swap before you get guard broken, because being stuck in that state is a very efficient way to get killed.
Weapon swapping also helps you sustain offence during a boss’s guard break. Keep the damage coming, but don’t finish the opening completely drained just as the boss recovers.
The balance I’m aiming for is cautious aggression: learn the dangerous attacks, counter them properly, keep working on the guard meter and use swaps to avoid exhausting yourself.
6. Complete Side Quests When You Get Them
I wouldn’t treat Phantom Blade Zero’s side quests as a checklist to clean up whenever the mood strikes. The world changes as you progress, and those changes can shut quests down.
NPCs may relocate. Some may die. A task that seemed perfectly safe to leave for later can become impossible without much warning.
Missing a quest doesn’t always end an entire side-quest chain, but it can cost you rewards such as accessories and Remnant Dust. That second reward matters more than it might initially seem.
Why Missing Remnant Dust Hurts
Remnant Dust is the currency you need for weapon upgrades and new skills. The problem is that normal enemies stay dead, so you can’t rely on the usual Soulslike solution of repeatedly clearing an area to grind out more currency.
That makes exploration and quest rewards valuable. The endlessly spawning explosive hazards in the factory aren’t a reason to assume you’ve found a normal farming loop.
My rule is simple: help NPCs and finish available tasks before pushing much further into the main route. Rushing ahead with a plan to come back later can leave you returning to a very different place.
5. The Blocked Outpost Route Opens After the World Changes
Early in Weeping Creek Valley, the Mandate Outpost has routes blocked by soldiers. You can clear the surrounding area and even reach the next map without finding a way past them.
If you’ve been searching for a hidden switch, the answer is more straightforward: this route depends on progression.
After reaching the Village of Lu, speak with the old man in a house near its entrance. He provides a quest directing you back to the outpost and bandit camp to investigate what’s changed.
I wouldn’t claim that conversation is definitely the precise world-state trigger. The exact timing isn’t completely clear. It is, however, a useful sign that it’s time to return.
Those previously safe locations are now hostile. Enemies have moved in, and the guards blocking the bridge are no longer in the way. Beyond it is a fairly substantial optional area, which means more exploration and more opportunities to collect Remnant Dust.
There are several different reasons a route might be inaccessible:
- It requires a key.
- It needs a particular Phantom Edge to break a barrier.
- It only becomes available after the world changes.
I check the quest log and revisit important locations after major map transitions. Not every change gets an equally obvious announcement.
4. The First Banyan’s Heart Is Hidden Beyond an Apparent Dead End
Two abilities in the training menu, Flow Like Water and Still Mind, require more than a pile of Remnant Dust. They also need the Banyan’s Heart.
There are five of these materials in total. The first is near the end of the Crimson Forest, and it’s remarkably easy to miss if you assume an attractive dead end is just an attractive dead end.
How to Reach the First Banyan Challenge
- Get through the Lost Wood. Follow the crying sounds to escape the repeating forest.
- Reach the Parting Mists checkpoint. The main route continues north.
- Head south instead. You’ll find a dock leading towards a lake with a huge tree.
- Continue into the shallow water. Unlike dangerous water elsewhere, this particular stretch can be crossed on foot.
- Approach the tree. Doing so starts an enemy gauntlet that ends with a boss.

The shallow water is the trick. After encountering water that kills you elsewhere, stepping off a dock doesn’t seem like a particularly brilliant idea. Here, it’s exactly what you need to do.
Bring a Phantom Edge capable of destroying shields. Several enemies in the gauntlet are shielded, and so is the boss.
There’s at least one mercy: if the boss kills you, you don’t have to repeat all the preceding enemies. Defeat it and you’ll receive your first Banyan’s Heart, allowing you to unlock an ability that requires it.
After that, keep an eye out for more trees with human faces. Once you know what those trees represent, they’re much harder to dismiss as background detail.
3. Standard Attacks Can Automatically Hit Multiple Enemies
My instinct in a lot of action games is to separate groups and fight one enemy at a time. Phantom Blade Zero gives you a reason not to default to that approach.
With certain weapons, standard attacks can trigger contextual moves that strike multiple enemies. An enemy in front and another behind can produce a two-target attack, while a larger crowd can lead to a spinning strike that catches several foes.
The exact trigger conditions aren’t entirely clear, and these moves aren’t consistent enough that I’d promise a particular attack on command. What matters is that ordinary attacks can adapt to the group around you, producing extra damage without a separate input.
You’re not helpless during those animations, either. You can still parry or dodge out of them.
That makes this mechanic especially useful when a boss summons support. Getting into the group and attacking can clear the extra enemies faster than cautiously isolating each one.
Two defensive details make the idea less reckless than it sounds:
- Parries work in every direction. You don’t have to be facing every incoming attacker.
- You don’t need a lock-on to parry an enemy. Your defensive options aren’t limited to your selected target.
I’m not saying to charge into every crowd without thinking. I am saying that standing between enemies isn’t automatically the terrible position it would be in another game. Sometimes getting stuck in is the more effective choice.
2. You Can Take an Enemy’s Horse and Ride It
This isn’t a mechanic you’ll use constantly, but it’s a fun one: kill a mounted enemy without killing the horse, and you can ride it yourself.
The difficulty is keeping the horse alive. In melee, it’s the big target directly in front of you, so it tends to take the hits intended for its rider.
I use a more selective ranged option instead. The Fanatic’s Broken Blade is useful for targeting the rider, and ranged Phantom Edges can do the job as well.
Once the rider is gone, mount the horse and charge into other enemies for a hefty amount of free damage.
It’s a small interaction rather than a core strategy, but it’s exactly the sort of thing that’s easy to miss if you always solve mounted encounters by swinging at everything in reach.
1. You Can Dodge and Parry at the Same Time
Here’s another action-game rule Phantom Blade Zero is happy to ignore: dodge and parry inputs can be used together.
The most useful example comes during the lake mystery side quest unlocked after reaching the Village of Lu. Part of that quest involves scarecrow-related encounters with magic-using minibosses. One fire-focused opponent is particularly annoying because it constantly throws projectiles.
Deflecting those fireballs can still set you on fire. Simply dodging them isn’t always reliable, either. It’s a nasty combination, but simultaneous inputs give you another option.
Parry and dodge together: the parry sends the projectile back, while the dodge helps remove the burning effect. Repeated dodges can also extinguish you quickly if you’re already on fire.
The same trick has emergency value elsewhere. If you can’t tell whether an unfamiliar boss is about to use a red or blue attack, pressing both defensive buttons can sometimes save you. Pair it with the Reflex Device’s wider timing windows and it becomes a more forgiving last-second response.
I wouldn’t build my entire strategy around mashing both buttons. It’s not a universal answer, and learning the actual attack timings is still better. But when the alternative is guessing wrong and getting flattened, it’s a very useful option to remember.
Break the Habits That Are Holding You Back
The biggest lesson I take from these mechanics is that Phantom Blade Zero rewards aggression, but not carelessness. Attack through guard when the situation calls for it. Swap weapons before your stamina becomes a crisis. Use the tools that turn a boss’s favourite trick into an opening.
Outside combat, give optional routes and NPC requests some attention before charging ahead. Between limited Remnant Dust, changing locations and hidden challenge rewards, exploring now is often worth much more than promising to come back later.
If I were starting again, my priorities would be getting the Reflex Device, experimenting with the Fanatic’s Broken Blade and making weapon swaps a habit. None of that makes the bosses harmless. It does mean fighting them with more of the tools the game quietly gives you.